Wednesday, May 18, 2011

School's Out! School's Out!

Well, this week marks the end of my girls' "school year".  School is the term we use for our girls' two-morning-a-week Mother's Morning Out program at church.  School has been my sanity this year.  I cannot begin to tell you how I look forward to 9-12 on Monday and Wednesday.  Some days I just wander through the aisles of TJ Maxx and revel in the fact that I am not pushing my double stroller.  At the beginning of the year, when my girls were a little less reliable in their solid night-sleeping, I will not lie...some mornings I went back to bed!   I have had breakfast with my husband, I have gotten my hair cut and colored...I could go on and on about the those magical six hours in my week!  To say that I appreciate those women who care for my children would be the understatement of my year.  That being the case, I have officially entered the end-of-the-school-year hand wringing over how to show my appreciation.  Let's be realistic.  I am not rolling in money.  My girls have five...yes FIVE teachers in their class.  I want to show them my appreciation, but it is probably going to be a small token of my appreciation, monetarily speaking.

I decided on a small gift card to everyone's favorite lunch spot - Chick fil A.  You can't go wrong there.  But, I wanted to include a heartfelt note letting my girls' teachers know how much their care for my children has meant to me.  I stumbled upon an idea at this cute little blog for a ruffled tulle card.  I decided to adapt the idea for my thank you note.  I love how it turned out!


I had some unused half-sheet note cards already.  As luck would have it, I had a roll of matching tulle left over from a little tu-tu making project I did a while back.  I cut my tulle off the roll at approximately 8 inches.


I folded the 8 inch piece in half length-wise.  I ran the folded piece through my sewing machine with my stitch length and tension set as high as it would go.  This is a quick little technique for creating a perfect little ruffle every time.


As you can see, the tulle ruffles-up (is that a real term?) as it passes under the foot of the machine.  You can then use the loose threads to adjust and even-out your ruffles.  Then, I simply sewed my little ruffle onto my notecard.  Did you know you can sew onto card stock?  I was not aware until I saw the tutorial!  It really works! (I went back to a normal stitch and adjusted back my tension and stitch length.)


The finished product.


I added my own little personal note of appreciation and slipped my dolled-up notecard in a lime green envelope for a pop of color.


Oh yes, and I added a little gift card as well!


A small token of my appreciation, but heartfelt nonetheless!

Wednesday, May 11, 2011

May Flowers

Well, I've been sitting at the sewing machine again!  I just love taking on a new sewing project - especially when it is something cute for my girls.  Here's the latest:


This shirt combines two of the hottest things in the "sewing world" these days...ric-rac and fabric rosettes.  I followed this tutorial for the rosettes if you want step-by-step instructions - I'm just hitting the highlights with my post.  So, so easy.  Again this project was great for me because it didn't require a lot of precision!  Notice a trend in the projects I pick to tackle?!?  I simply pinned the ric-rac in place and sewed it on by stitching down the middle.


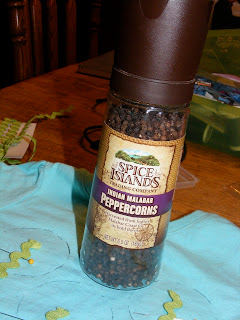
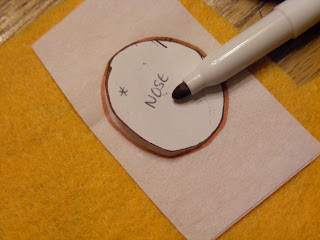
I outlined the circles I would sew my rosettes into.  I couldn't find exactly the right size for my "bloom" and I finally ended up using my pepper grinder!  Perfect size.


My fabric strips were cut to 1 1/2" and sewn together with a 1/4" seam allowance.  They were approximately 44" long.  (This is more than long enough.  I ended up cutting quite a bit off at the end that I didn't use.) When I flipped them right-side out using a safety pin (as instructed in the tutorial), they looked like this.


Then, you just sew and sew and sew in a circle using your outlined pepper grinder as a guide.  You can make little folds in the fabric to make the curve in the rosette.  It is really pretty easy and forgiving if you aren't just perfect.


I think it turned out pretty cute, huh?

Tuesday, May 3, 2011

Welcome

Someone has been busy playing with their new birthday toy!  I am thrilled with how this door turned out.  Let's hope it holds up to the direct sunlight it gets in the afternoon...


Friday, April 29, 2011

Easter in Review

Our Easter in pictures (and, well, a few words)...

Hey, this Easter Bunny thing isn't all that bad.  I'm a little freaked out, but I'm ok.


Oh, wait a minute.  I am not a fan of this huge bunny.  Please, Mommy, let me get off his lap!!!


I like the Easter Bunny when he brings me stuff.


I like am obsessed with jelly beans.


Thrilled with my new book.  (Mommy is glad you like it, but she is just thankful for something new to read.)


Just because it's so cute...


Easter morning on our way to church.


We're working on being a bit more lady-like in a dress.


I'm tired Mom, just take the picture.


This is as much of a smile as you're getting.  But, hey, at least my paci's out of my mouth!


Saturday, April 23, 2011

The Writing on the Wall

Well, I received a little early birthday present from Aaron this week.  Yes, I have a birthday coming up on Monday.  It's a big one and it involves a mid-decade mark.  If you are thinking 25, then you just go right on with that line of thinking.  Bless you.

Anyway, Aaron is one of those kind of husbands...if he finds out there is something I really want, no matter how frivolous, he finds a way to get it.  I had mentioned several hundred times that I would love, love, love to have a Silhouette cutting tool - primarily for its fabric-cutting abilities.  But, I knew that I could find lots of other things to do with it.  Well, what do you know...a box from Amazon landed on my front steps this week and a Silhouette was inside!!!  Happy Birthday to me!

I was so, so anxious to get it out and play with it.  Aaron was thoughtful enough to have ordered me a little starter kit as well. He knows me.  He knew it would just kill me to have that machine and nothing to do with it right out of the box.  So, I set to work studying up on it.

I had a little quote I ran across and bookmarked for use in something one day.  It said, "A perfectly kept house is the sign of a misspent life."  Truer words were never spoken!  How cute would that be on the wall of my laundry room - the site of all my piles and messes?  It would give me the chance to try running adhesive vinyl through the machine!

So, I spent several minutes hours scouring the web for the "perfect" font.  I finally found it and carefully laid my little quote out in the Silhouette program.


It was easy, easy.  The part that made me nervous was actually using the machine to cut something.  My machine came with silver vinyl, so I went with it and loaded it for cutting.


Okay, easy enough.  I nervously sent my designed quote to the machine.  (For those who care, I used the blue cap, no carrier, a speed of 8 and a thickness of 12 - per the Silhouette website.)  It began the cutest little humming and cutting process.  It kind of sounded like a bunch of little elves buzzing around in there with an razor blade.  Aaron and I both held our breath and watched as the vinyl began to come out the other side.  This is what the finished product looked like.  You can see the faint outline of the cut font.


I carefully peeled away the negative space.


It really worked!  I was amazed.  In order to transfer the quote to a wall, you need to use transfer paper.  So, I covered my quote in the sticky transfer paper.


Now, here is the tedious part.  We had to transfer to the wall.  This is the part where I tell you that there are two "kinds" of people in this world.  I am kind of an eye-baller when it comes to hanging stuff.  If it looks good to the naked eye, I figure no one will notice if it is not perfect.  My husband?  He broke out the level.


He started getting obsessed with getting it exactly, 100% level.  I reminded him that this was on the wall of our laundry room.  Who would see it anyway, but me?  It was also a very forgiving font with no exact baseline to each letter.  Let's just go with it.  We were very scientific and used this for smoothing out the bubbles in the vinyl.


Yes, that is a Pampered Chef gadget for scraping dried food off of their stoneware products.  We improvised.  It worked.


Peeling off the transfer paper was slow, steady work.


But, it was worth it.  Here's our finished product.


I am pretty pleased with it.  I still may frame it out or something.  It is a little lost on the wall and the silver doesn't stand out as well as I would like on my blue/green walls.  It's what we had and we worked with it.  But, it was really just a practice run anyway and it has given me tons of confidence to try other stuff on my new little gadget.  Besides, it makes me kind of chuckle when I read that on the wall of my laundry room.  Indeed, truer words were never spoken written!

Wednesday, April 20, 2011

Thinking Outside the Box

I was at preschool story time at our local library the other day with my girls.  There just so happened to be another twin mom there with her girls who are a few months younger than Lily and Harper.  We began chatting about twin challenges, milestones, etc.  She asked me a pretty typical "twin mom" question, "Who is your dominant?"

"Oh, Lily, without a doubt." I answered without even a moment's hesitation.  She commented how interesting it was that I would say that.  "I would have guessed the exact opposite," she said motioning to Harper who was in the middle of a big group of kids playing happily with toys.  Lily, on the other hand, was hanging pretty close to me and seemed hesitant to jump into the chaos of "play time".  I went on to explain some of my theories regarding the nuances of their emerging personalities.  But, our conversation has really caused me to think.

I think twins, obviously, present some interesting challenges to a first-time mom. But, more importantly, I have been really amazed at some of the great lessons I would have missed with just a single child.  That has been the case with this "pigeon-holing" as I refer to it.

I think it is really, really easy to start labeling our kids pretty early on - especially when you have two to "compare".  Oh, she is the athletic one or she is going to be an intellect.  I think we tend to put them in a box and I can't help but wonder how those "boxes" nudge them in one direction or another as they grow older.  The ebb and flow of Lily and Harper's personalities have taught me to not be too quick to drop them in one box or another.  Lily really stands up for herself; Harper tends to roll over when confronted.  Yet, Harper rushes into social situations without fear; Lily tends to hold back.  Who is the "stronger", more dominant personality?  Some days it can be hard to say.  Some days I think they just flat out flip-flop their personalities.

I do know this.  God has created them each uniquely.  It is up to Aaron and I to take those God-given personality traits and cultivate them.  We have to be observant and really "know" who our girls are.  But, at the same time, I don't want to limit who they are by being too quick to label them as one thing or another.  I'm going to let those little personalities continue to emerge and try not to categorize and drop each girl into their carefully labeled little box.  Here's to parenting outside the box...

Sunday, April 17, 2011

Elmo's World

Well, our house has been Elmo's World this last week - in more ways than one.  It seems that Lily and Harper have discovered Sesame Street.  Their favorite part?  Well, Elmo's World, of course.  Does any preschooler escape the "Elmo phase"?  I do have to admit, it is pretty cute how excited they get when he's on the screen.  I can't complain about the few minutes of quiet it gives me too!  (Although, Mr. Noodle creeps me out for some reason!)

On a related note, my friend Emily was having a 2nd birthday party for her little boy.  The theme?  Well, Elmo, of course!  She was lamenting the other day that she needed an Elmo shirt for him to wear at the party. Somehow, I agreed that I could make it.  I could make it, couldn't I?

I decided to go with a fabric applique.  I had played around a bit with appliques for a Christmas project and I was fairly certain I could come out with something decent.  I was very pleased with how it turned out...what do you think?


I worked with felt on this applique and I loved it!  After some googling, I discovered that felt seemed to be a pretty popular medium for appliques and I can totally see why.  It is fairly forgiving when you cut it out, it adds great texture...it is just a great material to work with.

After deciding on felt for the fabric, I played around a little bit with trying to sketch out my applique on my own.  Let's just say...I am not  an artist.  Stick figures are a stretch for me.  Finally, I had a stroke of genius and discovered that for $1.50, I could buy someone else's Elmo pattern on Etsy and trace it onto my heat transfer paper.  Sold...best $1.50 I ever spent.

This is what the pattern looked like after I cut it out of the pdf file from the Etsy seller. (I made my own pattern for the party hat and number 2.  I can draw a triangle!)


I used Steam-A-Seam made specifically for appliques.


I simply stuck the transfer webbing onto the felt piece I wanted to work with and then traced the pattern piece onto it.


I did this with each piece of the pattern on their respective colors of felt.  This is what my little Elmo looked like after all the pieces were cut out.


In addition, I cut out a little triangle party hat and the number "2".  The Steam-A-Seam was awesome and with just a little bit of heat from my iron, Elmo stuck really, really well to the t-shirt.  I wanted to reinforce him, though, by stitching around the outline of the applique.  In the past, I have used my zig-zag stitch to finish off my appliques with modest success.  In my googling about appliques, I discovered a tutorial that mentioned she found great luck in using her button-hole feature.  This concept seemed genius to me - the button-hole function would provide much tighter little stitches to outline my applique.  So, this is what I did.  It works beautifully and will be my go-to stitch for appliques in the future.  It is time-consuming and tedious to outline the entire applique, but pays off in the finished product.

This was my original finished product:


I was happy with this, but the little red ball at the top of Elmo's hat was really bothering me. You can't tell so much in the picture, but the circle is oddly shaped.  Turns out felt melts fairly easily under the heat of the iron and I kind of melted a side off the ball of the hat.  It looked just "okay".  Then, I had an idea...


Red pom-poms.  I pinned one on the top of Elmo's hat with a tiny little safety pin (for removal when washing).  Cute, cute, cute and that melted little ball on the top of Elmo's hat no longer bothered me.  It looked as though I planned it!


I am really excited about my felt applique discovery along with my button-hole stitching.  Thinking of all the cute things I could make for the girls with this idea.  And, who knows...maybe I will get to break out my Elmo pattern again.  We might just be having an Elmo-themed birthday party in October.  What 2 year old doesn't love Elmo?